Here is the complete little foto story: How to cover a bra.
Appropriate to the development of the belt there is certainly the bra.
Which model?
Now you have prepared or finished the belt or even completed the embroidering (the fringes come later), and now we start with the top.
Here you have to decide whether you want a bra-like top or rather a blouson-like thing with cut sleeves unveiling less skin.
That depends on your own feeling and taste and on your figure.
I have never sewn a blouson, maybe some of you can offer practical suggestions. There are carnival designs for such tops, which are not completely covered with embroidery.
Recently, these elastic velvet tops have become very popular, which are only partially covered with ornaments. They are available at
www.sakkara.de, www.canans-tanzmoden.de and many other suppliers.
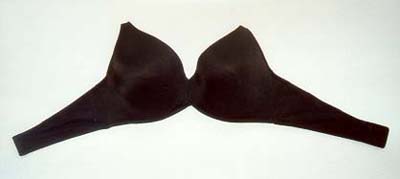
For the bra-shaped top, you first need a fitting bra, a solid one with stiff cups enhanced with wire inlays. They are sometimes called "Dirndl bra" or worn under shoulder-free evening dresses.
There are very nice models available now, produced in one piece and called "sweater bra" or "T-shirt bra".
The popular push-up bras (Wonder-Bra) are somewhat stiff, but not suitable for embroidering.
I would not recommend bras with water filled inlays ;-))
Soft bras are not suitable, on one hand because a "swaying" top does not look nice when you dance (it is enough if the bosom itself is swaying), and on the other because it is quite difficult to embroider such soft curves without them loosing their shape.
All following product names depends on german manufactures and shops.
My suggestion as standard model is Triumph Poesie, available up to size 85 B, sometimes bigger (by mail order). Kaufhof and Karstadt have their own lined models, which fit quite well. C&A offer a wide selection of all sizes, sometimes even with embroidery (which has to be removed, as it has to match the belt).
Otherwise, simply shop around. On bargain counters, you may find bras for 5 Euro, or you can spend 30 Euro and more.
Important: better get a well fitting bra; if in doubt: take the larger size.
The cups have to fit well, it does not matter for the moment whether the back is too wide or too narrow. With very varying proportions (wide hips and narrow chest with small bosom) or if your bosom needs "support" simply add some "vitamins": buy the bra one size larger than you need it and fill it with inlays. There are many different versions, starting from simple shoulder pads to special inlays or skin-like parts tightly adherent to the skin due to body heat.
This little cheating is absolutely legitimate!
With very large sizes (85 C or more), searching a fitting model becomes an adventure (Triumph Amo D is available up to 95 C).
In the meantime, the industry has realised that women have larger bosoms, and there are more and more large sizes available, mail ordering is a good hint, too.
How to calculate the sizes:
Recently, I found the following report in "Brigitte" 20/2002 (german magazine):
One of two women wearing a bra is not satisfied with the models. Why that? Often, they buy the wrong size: The Textile Research Institute Hohenstein has found recently that almost one out of three German women is wearing too tight bras.
How to find the correct size? By measuring the size below the bosom and the cup size (A, B, C etc.)
The latter results from the difference between the under-bust measurement (for size 38 mostly 75 cm) and bust measurement (taken at the widest part; with size 38 mostly 90 cm (35,5 inches), which corresponds to cup 75 B).
A difference between the two sizes of 12 to 14 cm (4.7 to 5.5 inches) corresponds to cup A, 14 to 16 cm (5.5 to 6.3 inches) to to cup B, 16 to 18 cm (6.3 to 7.1 inches) to cup C. According to recent surveys, the size best sold in Germany is 80 C (in 1983 it was 75 B).
Important is the good fitting. A new bra should first be closed on the outermost row of eyes, so that you can make it tighter at a later point of time. The cups have to be flush at the décolleté, not too tight and without folds. The straps should be adjusted individually already when trying the bra on, wide ones cut less into the skin than narrow ones. And: don't wear the bra too long! The elastic material is losing stability due to body heat and washing.
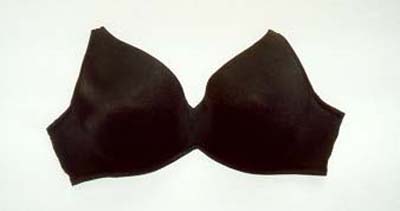
Preparation
There are models with cut straps and strapless ones, where you can remove the straps. Everyone has to find out the suitable shape herself, you should feel comfortable in the bra.
|
|
|
As preparation, first remove straps and plastic rings. Some models look nicer when you emphasize the V décolleté in the middle of the front: carefully cut and seam with zigzag stitches (otherwise the wire end may pierce through).
Hint: the more narrow the bra appears in the middle of the front, the lighter it seems to be. Therefore, I sometimes fold the bottom edge over in the middle of the front to approx. 10 cm (4 inches) width and fix it.
That makes the top look lighter, although fringes in this place may cover the effect. But: the shape is still visible under the fringes!
For a bra with front fasteners: sew the front together and cut the back. I don't trust such a fastener, and if a fastener opens, I prefer it to open in the back.
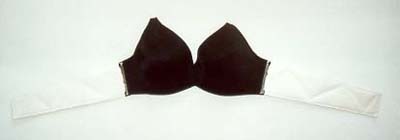
From behind, some bras look like this:
I cut the round part straight so that it does not look like lingerie any more (see arrows). The resulting edge is seamed by sewing one of the removed straps on top (with zigzag, off course).
Or remove these parts right away and replace them by the solid side parts described below.
leave the connection between the cups in the front as it is, I also prefer the sides to be covered and don't cut anything out.
Before, I used to leave the elastic side parts on, covered them with elastic material and embroidery, thus the top remained elastic.
Now I don't do this any more, as costumes covered with velvet or design print have become fashion which are not completely covered with embroidery any more. And I prefer the firm and solid solution.
Therefore, I cut the side parts off, about 2 cm (0.8 inches) behind the cups and sew my own, firm side parts (difficult to see on the picture).
They are of the same material as the belt basis: one layer of Kalmuck in the middle and 2 layers of nettle or cotton outside, tightly fixed with zigzag stitches.
They have to be cut out a bit longer than the elastic ones, as they cannot expand any more.
I recommend taking the under-bust measurement first!
These side parts are sewn on the edges with zigzag.
I remove all eyes, hooks and straps.
This is my personal experience, but all depends on your own taste.
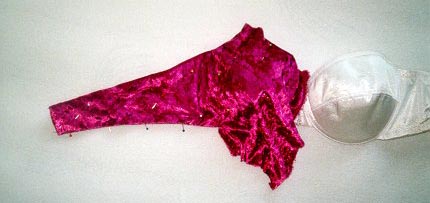
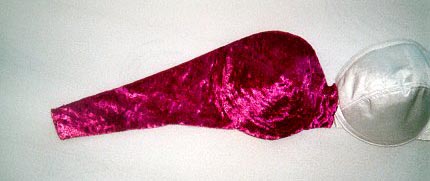
Covering the bra
Here is the complete photo story: Covering the bra
Now comes a rather tricky part: Covering the bra. I prefer somewhat elastic jersey or lycra or elastic velvet, which is becoming more and more popular.
It does not have to be elastic, but it is easy to work with jersey or elastic velvet. If you have not removed the elastic side part of the bra, you should use a cover material which is elastic in the horizontal direction as well.
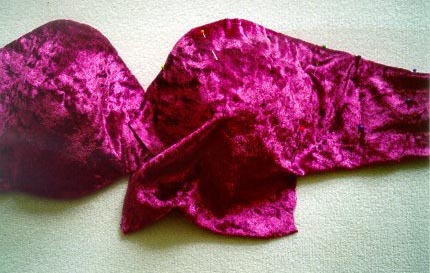
I cover each cup with a piece of cloth, starting with the top edge and pinning on the cloth. Then I place the cloth loosely on the cup towards the side part. At the bottom part of the cup, there is a lot of superfluous material. Fine so, there will be a dart.
You have to try around a bit to cover the cup completely and without any folds. Don't pull anywhere, simply place the cloth on the cup, and it will easily follow its shape. With some good luck, the cloth will even cover the side part. Pin everything tight, cut away what is too much, fold over and pin to the inside.
The connection between the two cups is another tricky part, here you have to make a seam; the darts are tricky as well: both of them should have the same length, and sometimes it is difficult to form them in the same direction. But with some patience you will succeed!
I sew all this by hand: Along the edge with small, almost invisible stitches. And then I fix the part folded over to the inside. The dart is closed like the seam between the two cups.
Embroidery and Ornaments
Now you can start embroidering the bra, which is relatively easy: it should look like that on the belt. In most cases, I distribute the main embroidery along the top edge of the cups around the décolleté, about 6-8 cm (2-2.5 inches) wide.
Please don't place any clearly visible single circular objects on the middle of the cups!
Under the arm, three-dimensional ornaments are not very common, because they are hardly seen in this place, and they will scratch. You can place some ornaments in the back, but only small ones, as there is not so much space.
For working near or on the enhancing wire, you will need a thimble and sometimes pliers for piercing or pulling the needle through.
Now, all free parts are covered in the ground color. In the back, on the elastic part, this should be done in zigzag along the longitudinal direction.
Here again the link to the short photo story: how to make a top.
Straps
For the straps, I buy a 12 - 15 - 20 (0.5 - 0.6 - 0.8 inches) mm wide elastic strip and cover it with elastic material. Sew it by the machine with zigzag: first sew a strip of cloth with straight stitches on the back (elastic in the direction of the elastic strip), then fold the cloth around the elastic strip, cut and sew again, slightly pulling so that the strip remains elastic.
Also these straps can be covered with sequins, and they should remain elastic even then. If you want to have non-elastic straps, use seam lace instead of the elastic. Or sew seam lace on the elastic strip, but not over the full length so that it can expand only slightly.
Now there are various ways to fix the straps: the normal straight bra straps over the shoulders to the back or the neck straps with a fastener in the neck. You can also mix both: fix two straps in the middle of the front in addition to the neck strap and fix them to the neck strap on the shoulder or use both strap versions at the same time. Any combination is possible.
If you have a larger bra size, however, you have to try where exactly you have to place the straps. Sometimes moving them 1 cm (0.4 inches) makes a big difference, the cup leans to the side or to the middle as you like. And that can even be different on each side!
You have to try. One may look like a boxer with neck straps, as the muscle-packed arms are emphasized. The other one wishes to fix sleeves to the straps, and for this purpose the straps should be over the shoulder. The same applies if you want to make your narrow chest appear a bit wider, perhaps with very wide straps or fringes on the shoulders.
Sometimes, a top requires a connection to the back for static reasons, especially if many fringes cause additional weight.

I like the following version: one pair of straps is fixed on the sides of the front and closed in the neck. 2 'transoms' come from this strap to the back edge of the bra, with a distance of 8-10 cm (3-4 inches) in the top getting larger towards the bottom.
Then, you have additional securing in the neck, apart from the normal fastener. That looks very nice, reduces the weight impact on the neck strap and gives double security.
The bra should be placed so high that the optical distance between bra and shoulder is smaller than that between bra and belt, that results in nice proportions.
Bridge between the cups
Sometimes everything looks very nice, but somehow it does not fit. The bosom is not where it is supposed to be, or it does not look as it was supposed to look. Maybe the reason is the connection between the two cups?
Should they be closer together, or more apart?
Or perhaps more together at the bottom inside, and apart on top, or somehow tilted?
Answering a question by Dschinny, Djamila (thank you!) has given a wonderful hint and allowed me to publish:
Dear Dschinny,
It should work this way: shorten the bridge and place the cups closer together, with the upper distance smaller than the lower. Alternatively, you can remove the bridge completely and sew the cups together.
And then move the straps slightly to the middle now the cups tilt a bit towards the centre, and voilá, you have a wonderful décolleté!
I hope you know what I mean!
Best regards, Djamila
P.S. You can create a variable push-up effect with two strings fixed on the straps in the neck that you can tie looser or tighter, as you like.

move the strap a bit towards the middle
make the bridge shorter, at the bottom wider than at the top
Nadya's comment:
I am not sure whether - for big bra sizes - moving the straps more to the middle really has the desired effect.
According to my experience, the cup tends to tilt towards the middle, if you place the strap more to the side.
Try yourself!
Fasteners
Pin the straps on the bra, then check out the length and find the position for the fastener. If the measurements were taken correctly, everything should fit perfectly.
A long overlapping part is better than a too short one, which has to be extended now.
Then sew 2 hooks (on the right) and 2 eyes (on the left) on top of each other (Prym No. 3, for example, they are smaller, have a slight resistance and don't tend to open spontaneously). To stabilise the hooks, I fix a thick snap fastener in the middle between the two hooks directly at the edge, so that the fastener becomes less visible.
The top has to fit tightly, the straps have to be under tension, nothing must slip.
In the neck, the straps should overlap for 6 - 8 cm (2.5 - 3 inches), so that you can apply 2 hooks behind each other and a thick snap fastener in between. One hook alone seems too insecure for me, and the snap fastener keeps the straps in position, so that the hook cannot twist and open. The part of the strap hidden under the overlapping does not need embroidery.
(Everything is sewn with double buttonhole thread, clear?)
Copyright © 2000-2012 by Nadya - All rights reserved.
Last modified: